The Vocia Text-to-Speech Processor (TTS-1) and Vocia Text-to-Speech Processor nurse call (TTS-1nc) uses a networked Text-to-Speech engine to convert text elements to audible voice announcements in a multitude of languages and voice fonts. TTS-1 and TTS-1nc Voice fonts are licensed and are purchased independently of the TTS-1/TTS-1nc hardware.
In keeping with the distributed nature of a Vocia system, the TTS-1(nc) uses an Ethernet connection to facilitate configuration and operation as well as to pass any messaging information to the MS-1.
Once a TTS-1/TTS-1nc has been configured, the end user is able to access and modify the announcements via a web browser interface. This makes the TTS-1/TTS-1nc a valuable announcement tool for remote sites or those residing in unattended locations.
Any installation that makes use of a TTS-1/TTS-1nc must feature a Vocia Message Processor (MS-1) within the same Vocia World.
Text-to-Speech sequences must be pre-configured in the software. Each text sequence can be made up of static text, dynamic text, a drop-down list and Pre-Recorded message elements.
When creating a text element, under the Text Options subheading additional customization for the text elements can be configured. The Text Mode dropdown box can be set to Normal, Numeric, Alpha and Alphanumeric. This setting applies to the entire Text Element (each sequence can be made up of multiple text elements) and is used to determine the type of text that can be entered in to the web interface by the end user.
The maximum text length is set by default to the highest allowable setting of 250 characters per message element (again, multiple elements are able to exist in each Sequence). This character limit can be restricted to control the length of text that can be entered in the TTS-1 Web Interface. The total Pre-Recorded Message element of any Sequence is limited to a two minute maximum, however text elements are not included as part of this limit.
The Read Only checkbox is used to determine the status of the text element when presented in the TTS-1 Web Interface. By making an Element ‘read only’ it means that the client will be unable to adjust the text from within the web interface.
The TTS-1 web interface doesn’t provide a list of .WAV files or Zones that the text sequences can be routed to from the webpage. However, the text elements can be created and implemented in a way that will increase user friendliness and the organization of the sequences. This includes the ability to preview some text sequence elements on the sound card of the device with the active browser session
In a TTS-1 sequence quotation marks can be used to change the Text-to-Speech conversion behavior. For example, for the text string:
"Apple, 123456, 'a''p''p''l''e', '1''2''3''4''5''6'', + =
The converted text will be announced as: “Apple, one hundred twenty three thousand four hundred and fifty six A, P, P, L, E, 1, 2, 3, 4, 5, 6, plus, equals”
1. Add an MS-1 to the Vocia project and configure it for IP communication.
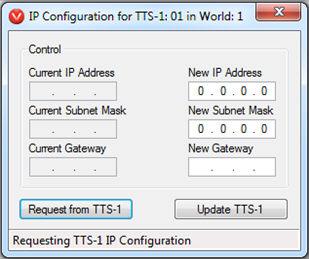
2. Add a TTS-1/TTS-1nc to the project. Right click on the TTS-1/TTS-1nc in the main layout and select IP Configuration. Enter the desired IP address, subnet mask and gateway information.
Figure 1: TTS-1/TTS-1nc IP Configuration
dialog
3. Configure a VTP User in the Universe properties with a User Name and Password. Note that the User Name and Password are case sensitive, limited to 16 characters and must not contain spaces.
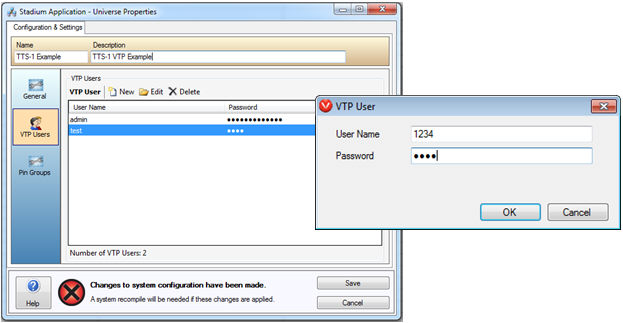
Figure 2: Universe Properties
/ VTP Users configuration
4. Ensure a voice font has been installed on the TTS-1/TTS-1nc by opening TTS-1 Voice Management from the Tools menu. Although a complete list of voices are shown and selectable in the World properties > TTS-1 Sequences > Voice tab, you can only use an installed voice font.
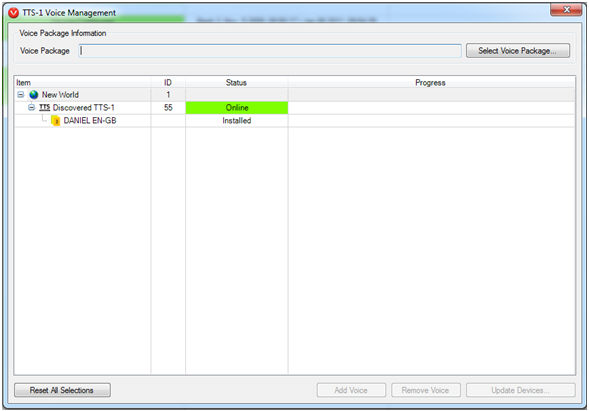
Figure 3: TTS-1 Voice Management
window showing where new voices can be imported and where to manage ones
already installed
5. Open the World properties and select the TTS-1 Sequences tab. Create a new sequence. When naming the sequences, note that the web interface will display the sequence list in alphabetical order. By placing a number before the name you can ensure the most critical or frequently used ones are displayed at the top of the list.
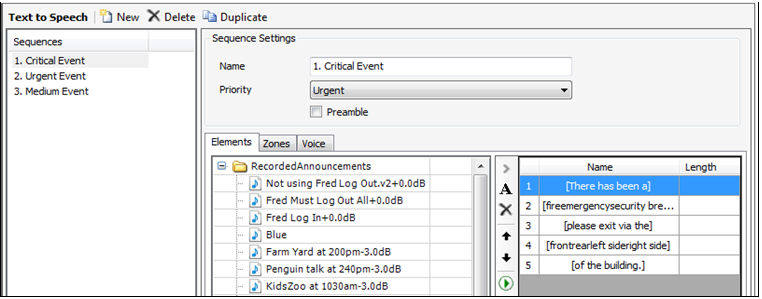
Figure 4: Creating and prioritizing
a Text-to-Speech sequence
6. Once a sequence has been created the elements for that sequence must be defined. A drop down menu is shown for this example. Firstly, select the Drop Down List checkbox and enter the desired menu items in the Enter Text field. Note that each line represents a new selection in the list.
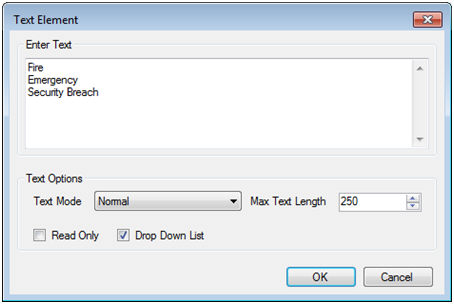
Figure 5: A Drop Down List Text
Element with three selectable items
7. Allocate the Text Element to the designated Zone(s) and assign the voice font to be used.
8. Send the configuration to the system. Navigate to the IP address of the TTS-1/TTS-1nc using any standard web browser and at this point you'll have access to the web interface.
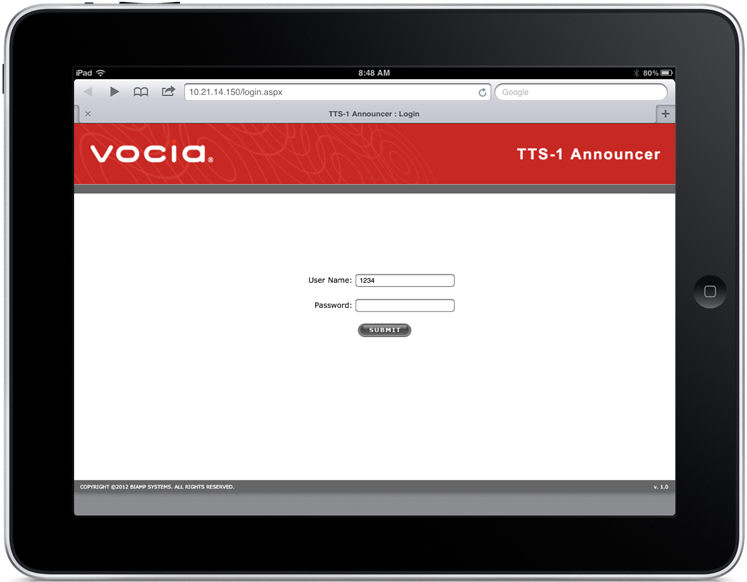
Figure 6: Accessing the web
interface from a tablet
9. Log in with the credentials of the VTP User you created in Step 1. Note that although many individual user accounts can be created, all users will be presented with the same options for available paging sequences and associated Zone routing.
10. Once authenticated a list of available Sequences are presented.
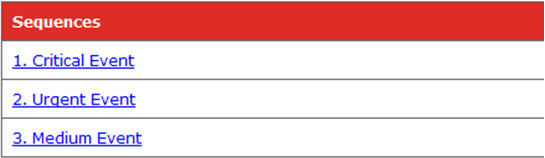
Figure 7: The web browser display
of configured Sequences
11. After selecting a desired Sequence, its comprising elements will be shown. Any elements shown in blue can be edited, whether it’s via a dropdown list or via a dynamic text element.
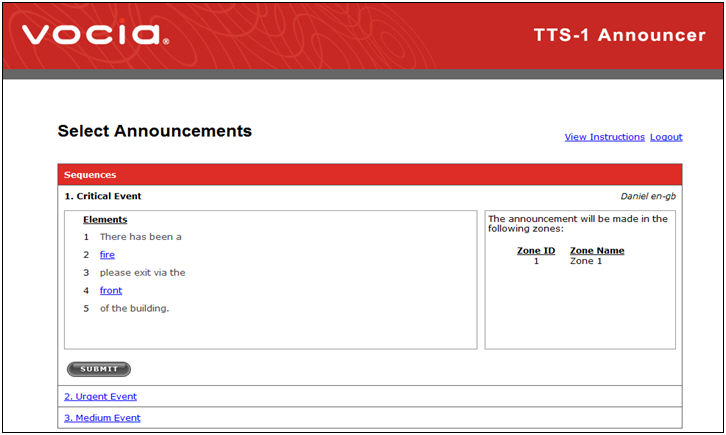
Figure 8: The available Elements
of the selected Sequence
12. Let’s say the critical event was not a ‘fire’ but a ‘security breach’ instead. Select the blue ‘fire’ hyperlink and using the dropdown to select the appropriate emergency.
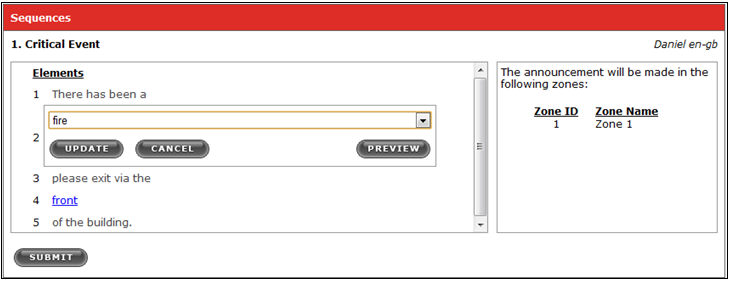
Figure 9: Select the appropriate emergency from the dropdown menu
13. Use the Update button to lock in the correct element. Once the sequence has been constructed the Submit button can be used to begin the message playback.
If Auto Repeat functionality has been enabled for the current Sequence an Auto Repeat sub window will be displayed and available to specify the Auto Repeat parameters.
Depending on the Sequence configuration the web interface will provide fields that can be used to specify the number of Repetitions (or Infinite) and a field to specify the time between repeating messages. The time is specified in hours, minutes and seconds. The control allows times up to and including 12 hours to be entered as long as no restrictions have been assigned in the sequence configuration. The web interface can support a maximum of 100 simultaneous Auto Repeating announcements. If multiple repeating Sequences are sent to a discreet Zone the messages will alternate their playback cycle so both will be heard.
The Web Interface also provides a hyperlink to list all currently Repeating Announcements labeled View Repeating Announcements. Selecting this link will show a list of currently repeating announcements. Functionality is also provided to Cancel any one, or all of the repeating announcements generated from the TTS Interface.
To switch back to the list of Sequences select the View Announcements hyperlink.