Setting up a Simple Paging System
Quick Reference Guide -
The following quick reference guide will enable the system designer
to quickly set up a Vocia Paging System. Page Codes with Preambles are
also covered in this section. The system described here consists
of a WS-10, a DS-4, a VI-6, a VO-4 and a WR-1 but the steps required can
be followed using other Vocia devices as well. This guide assumes
that the Vocia software package is installed.
- Open Vocia software by selecting the Vocia shortcut icon on the
desktop or via the Start menu.
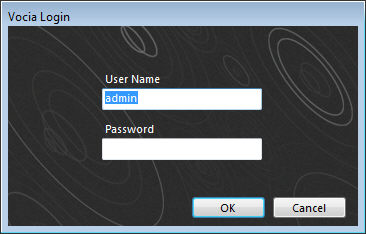
- Enter password if required. The first time the software is used,
the default user name will be Admin and no password will be required,
as shown below.
- Select the New Project icon on the Toolbar or New Project under
the File
Menu.
- The New Project dialog
will appear. Enter the location where the project files should
be created, the Universe Name
as well as a World Name. Select
Create Folder for Project
if a subfolder within the Project Location should be created. Then
select the Network Adaptor
that you wish to use for connecting with Vocia devices.
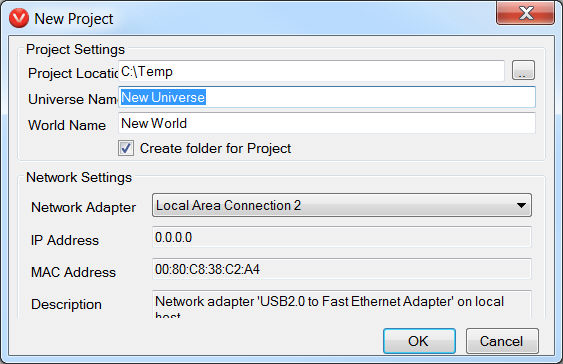
- Select OK once the correct
selection has been made.
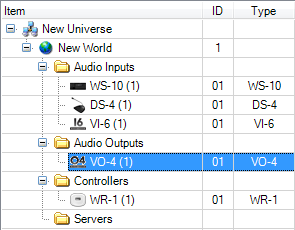
- Now that the Layout has been
populated by the Universe tree devices can be added to create your
system by using the Project
Menu or by right clicking the folders in the under the World you
wish to configure. For this example we will be adding a WS-10,
a DS-4, a VI-6, a VO-4 and a WR-1.
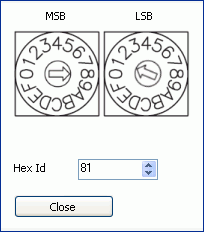
- After adding the devices, you can assign new Device IDs if required.
The Device IDs need to match what is found on the pieces of
hardware that you have. They can be changed both in software
and on the Device if required.
To assign an ID in Vocia software you need to double click the device
and then select the ID dropdown window. Select the ID required and
select Save Changes to confirm. To change an ID on a device use
a flat blade screwdriver to turn the ID switches to the desired configuration.
You will need to powercycle the device if the Device ID is changed.
- Now that the devices have populated the tree and have the correct
ID numbers, you can start configuring the World. Double click
the New World icon. The World
Properties dialog window will open to the Zones tab. Name
the World if required at the top of the dialog window.
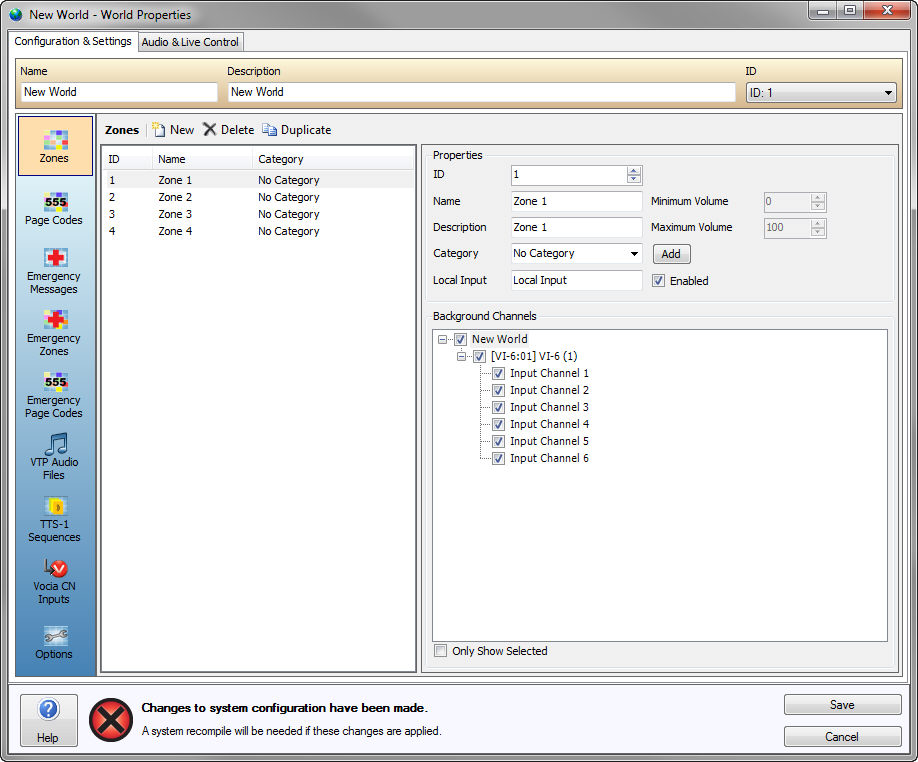
- Name the Zones and Categorize if required in the Properties section.
- Now we need to add some Page
Codes. Select the Page Codes tab and then add by selecting
the New icon.
- If you have added a VI-6 you will see that the Background Channels
window has been populated by Input Channels. Select the Background
Channels that are required for each Zone.
- Now its time to configure the Page Codes. Select the Page Codes
icon. Add some Page Codes by selecting the New icon. Naming
the Page Codes works the same as it did for Zones. Select a
Priority
Level for each Page Code and select the Play
Preamble checkbox.
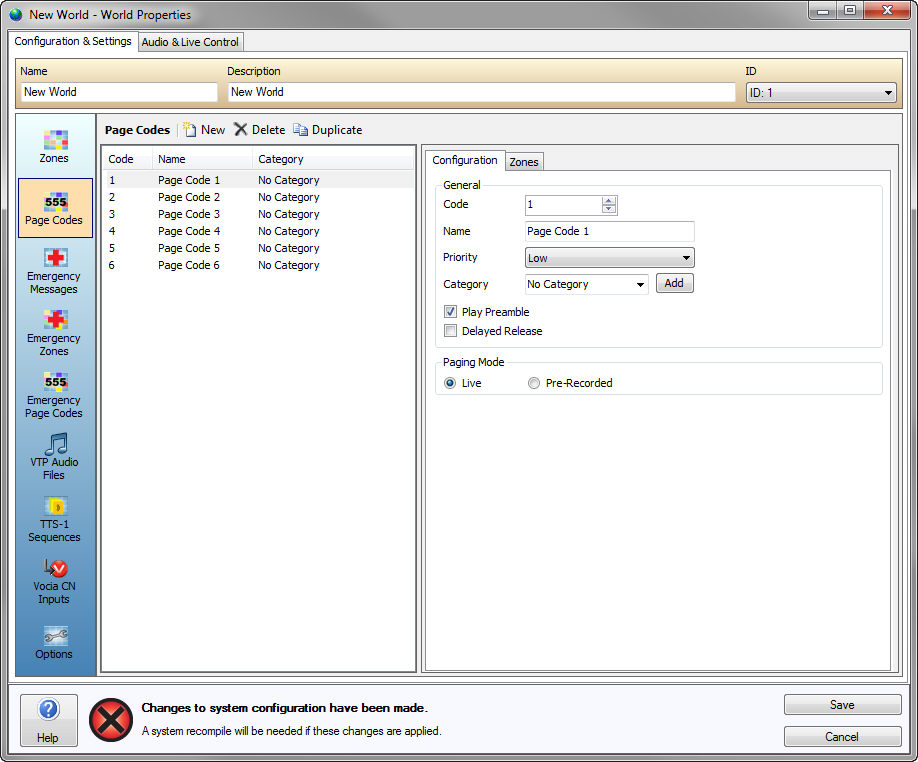
- Now select the Zones tab and selected which Zones you need the
Page to be routed to. When finished select Save Changes.
- The Audio File Manager is found under the Tools Menu. We
will need to import some .WAV files to use as Preambles. Select
Add File then browse to the .WAV files you wish to import. Once
you have imported all of the .WAV files you need select Close to exit
the dialog.
- Now that we are back in the Main Screen we can configure the Devices.
Each Device has configuration settings that need to be considered
to create a functional Vocia system.
- Paging Stations (WS-4,
WS-10,
DS-4,
DS-10)
need Page Codes and Preambles to be assigned to
them. Preambles are set in the according to the Priority
Level of the Page Code and can differ per device. For this
example select a Preamble for each Priority Level. When
this is complete select the Page Codes icon and assign the Page
Codes required for the device. Select Save when complete.
The VI-6
does not have any settings vital to project creation but channels
can be named for ease of use. The default settings for the
VI-6 are that each channel will act as a background channel.
The VO-4
needs to have Zones assigned to Output Channels. Double
click the VO-4 icon and assign Zones to Output Channels using
the dropdown boxes marked Zone for each channel required.
The WR-1
needs to be assigned to the Zone in which it is going to control
background sources. This is done in the WR-1 Properties
device dialog window. Double click the WR-1 icon then use the
Zone dropdown box to assign a Zone to the WR-1.
- If all of the steps mentioned have been completed you should be
able to Validate
the project file by pressing F5 or selecting the Validate icon in
the Project menu. Following the Validation process the project file
will need to be complied and sent to the devices. This two step
process can be performed in one step by selecting the Send
Configuration icon or its corresponding entry under the Network
Menu. If the project is valid the Vocia software will Compile
the file, attempt to connect to the system and send the project information
to all the selected Devices.
- If successful the Devices will all turn Green/Online in the Device
tree and you will have a functioning Vocia system. Please wait
at least a minute for the devices to receive all of their required
configuration information. If not, review the steps shown in
this guide or consult the Help file for further detailed information
(see Validate,
Network
Considerations).